Performing FCI Post Installation Tasks
Introduction
In this lab, you will perform some common SQL Server failover cluster instance post installation tasks.
Objectives
At the end of this lab, you will be able to:
- Review SQL Server FCI Resources and Dependencies in Failover Cluster Manager
- Manually failover SQL Server FCI from one node to another
- Configure a Static TCP/IP Port for SQL FCI
- Enable a Firewall Exception for SQL Server FCI on the Cluster Nodes
- Configure Remote Access for a dedicated administrative connection
Estimated Time
30 minutes
Logon Information
Before Login make sure windows has Applied Computer Setting to all nodes.
Use the following credentials to login into virtual environment
Connect to AlwaysOnClient as Administrator using Pa$$w0rd as the password.
Click the Type Text icon to enter the associated text into the virtual machine.
Connect to AlwaysOnN1 as CORPNET\Administrator using Pa$$w0rd as the password.
Click the Type Text icon to enter the associated text into the virtual machine.
Connect to AlwaysOnN2 as CORPNET\Administrator using Pa$$w0rd as the password.
Click the Type Text icon to enter the associated text into the virtual machine.
Connect to AlwaysOnN3 as CORPNET\Administrator using Pa$$w0rd as the password.
Click the Type Text icon to enter the associated text into the virtual machine.
Connect to AlwaysOnDC as Administrator using Pa$$w0rd as the password.
Click the Type Text icon to enter the associated text into the virtual machine.
Change the screen resolution if required.
You may want to adjust the screen resolution to your own preference. Do this by right-clicking on the desktop and choosing Screen resolution and clicking OK when finished.
Screenshots in the lab instructions may appear with a lesser SQL version number than is installed in the lab environment where functionality is not affected.
Lab Environment
Before we begin with the first exercise in the lab, let's review the lab environment.
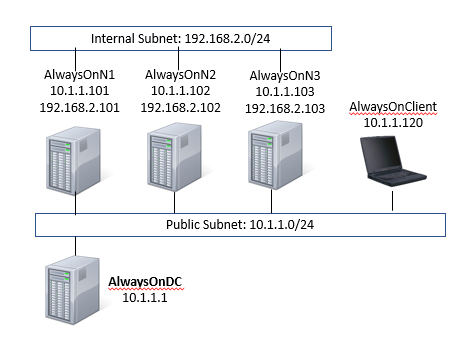
- In the lab, we have one Domain Controller, 3-node Windows Server 2022 cluster and one Windows 10 client computer.
- AlwaysOnN1 and AlwaysOnN2 nodes are in the primary Datacenter.
- AlwaysOnN3 is in the secondary datacenter.
- For this lab, both the datacenters are in the same subnet.
- SQL Server 2022 FCI (SQLFCI\INST1) is installed on AlwaysOnN1 and AlwaysOnN2
Exercise 1: Review SQL Server FCI Resources and Dependencies
In this exercise, you will review the SQL Server FCI resources, properties, policies and dependencies.
Task 1: Review SQL Server Cluster Group
Perform this task on virtual machine AlwaysOnN1 as logon user CORPNET\cluadmin using the password Pa$$w0rd.
Click the Type Text icon to enter the associated text into the virtual machine.
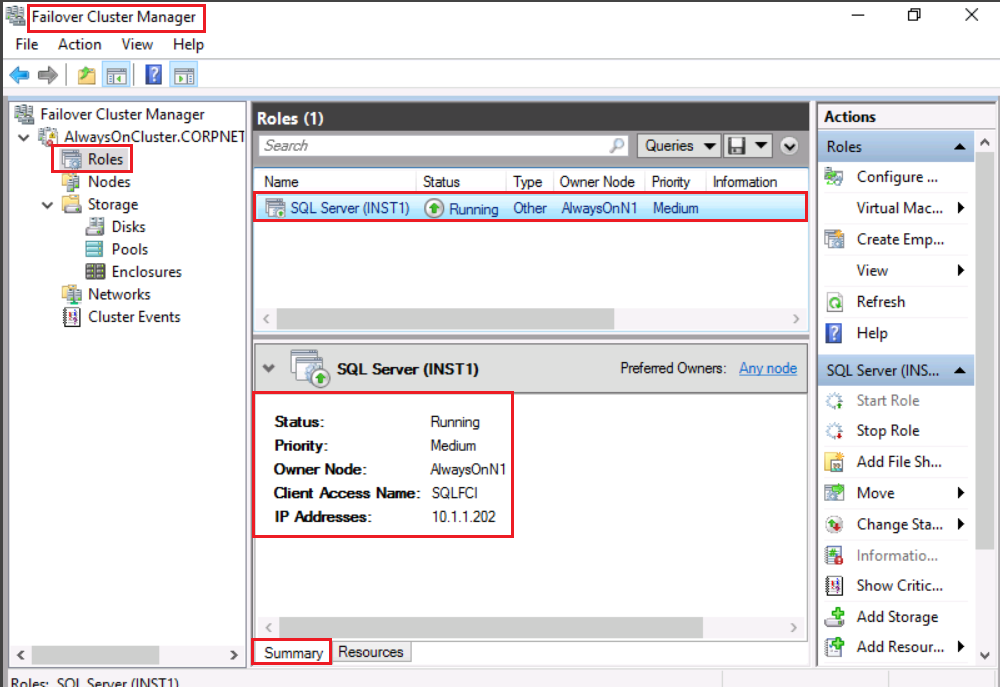
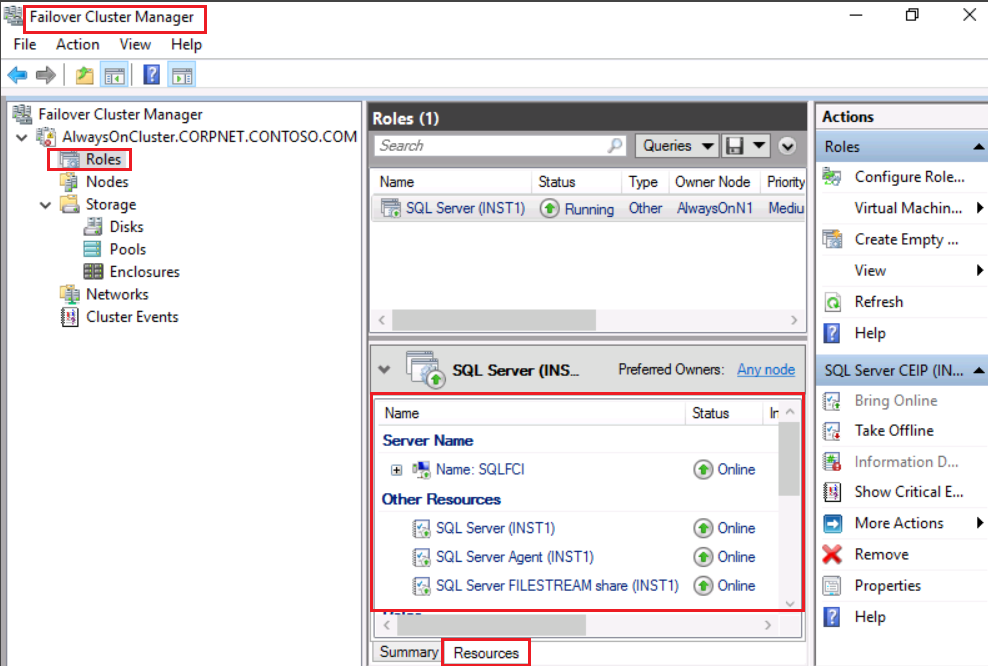
Open Failover Cluster Manager and review the SQL Server Cluster Group and Resources as shown below.
Task 2: Review the properties of all the resources
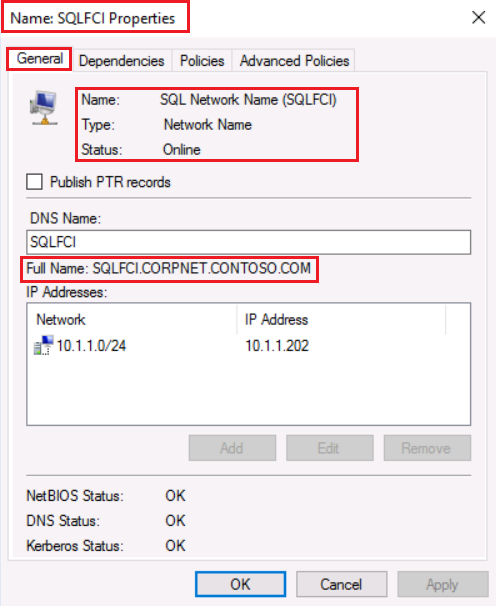
Right-click a resource (for example, Name: SQLFCI) and click Properties.
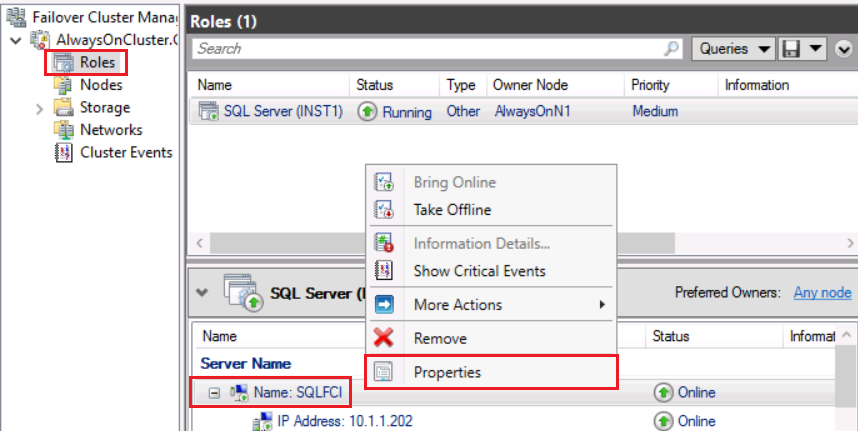
The properties popup will appear as shown below.
For detailed information on properties, review Microsoft TechNet article Clustered Role and Resource Properties )
Review the General properties.
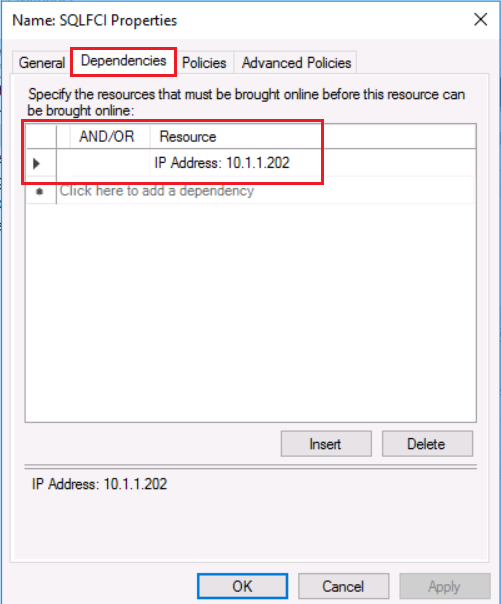
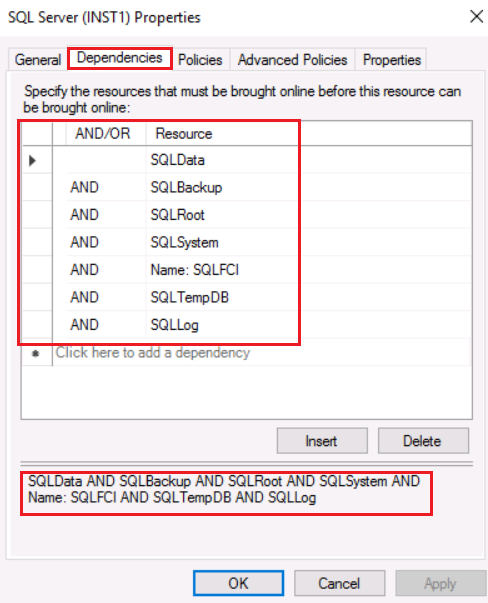
Click the Dependencies tab and review the dependencies.
Network name resources are dependent on IP address resource/s.
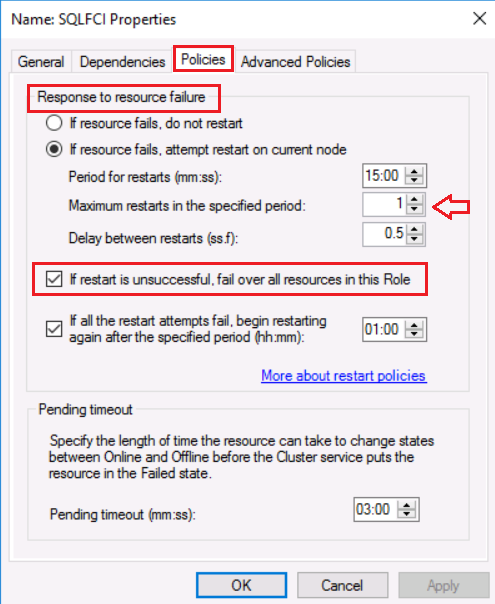
Click the Policies tab and review default policies.
This is the tab where you can specify how you want the resource to respond when it fails. By default, if a resource fails, it will try to restart (N - 1) times (where N is the number of cluster nodes) on the current node and if the restart is unsuccessful it will fail over ALL the resources in this Role (aka cluster group). Since this is a two node SQL FCI, the maximum restarts is (2 - 1) = 1.
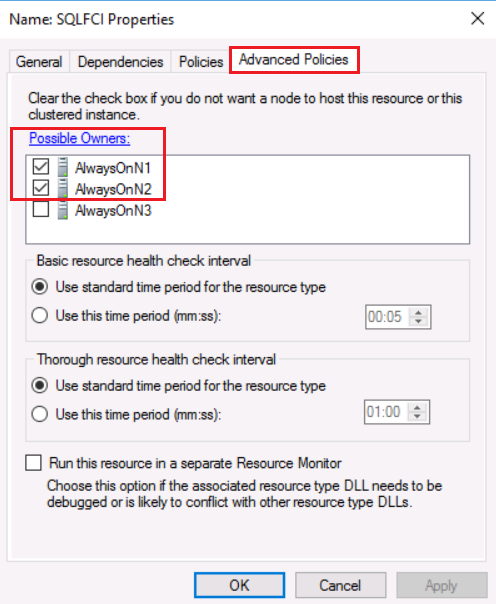
Click the Advanced Policies Tab. Verify that both cluster nodes (AlwaysOnN1 and AlwaysOnN2) are Possible Owners.
The nodes that are listed as possible owners of a resource limit where the SQL Server FCI can run. If all the resources on an SQL Server FCI have the same possible owners, the server can run on any of the listed nodes. If one of the resources cannot list a node, the SQL Server FCI cannot run on that node, even if all the remaining resources list the node as a possible owner. If no possible-owner nodes are up, the group still fails over to a node that is not a possible owner, but it does not come online.
There is another similar property called the Preferred Owner. A preferred owner is a node that you prefer a Role (aka cluster resource group) to run on. During a failover, the group is moved to the next node in the preferred owner list. To review the preferred owner list, right click the SQL Server(INST1) Role and select Properties as shown below.
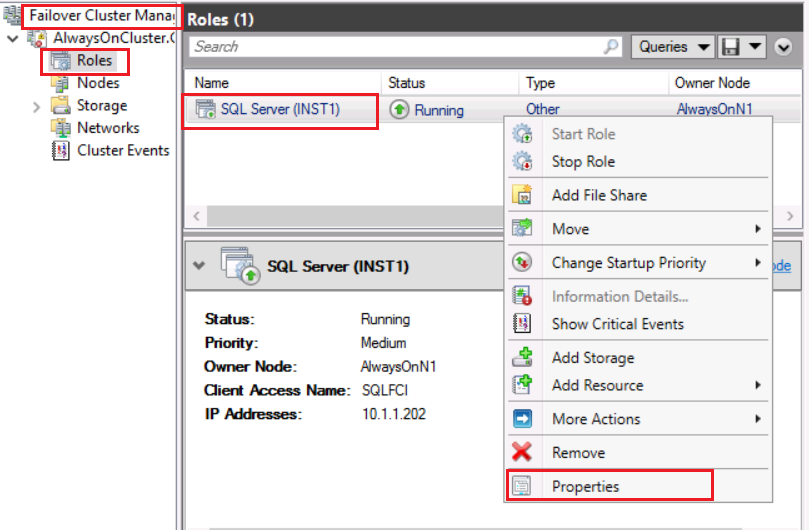
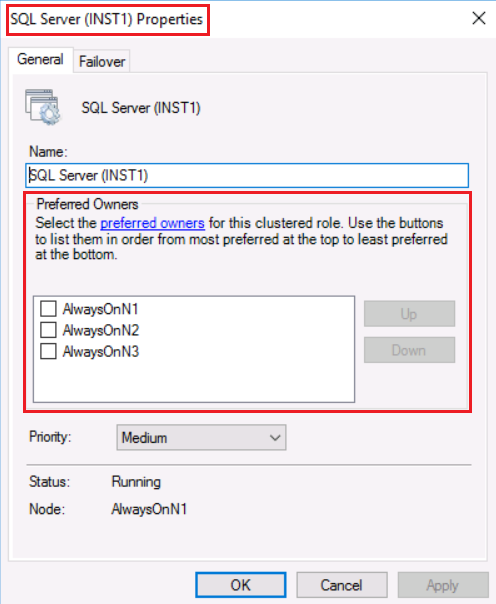
Click the Failover tab to review the default failover properties of the SQL Server (INST1) role.
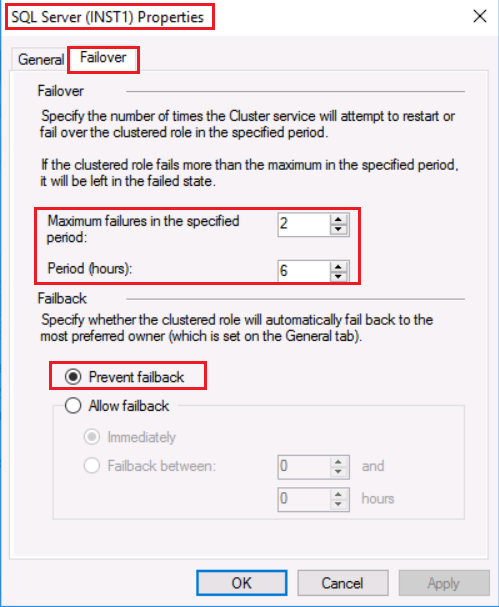
By default, the SQL Server (INST1) role will attempt to restart twice in 6 hours. If the role fails more than twice in 6 hours, it will be left in the failed state. Also, the default Failback policy is set to Prevent failback. To understand this, let's assume that the Preferred Node is AlwaysOnN1. Say AlwaysOnN1 has a problem and it shuts down. Windows Server failover cluster will automatically failover SQL Server to AlwaysOnN2 node. Now say AlwaysOnN1 restarts, if Prevent failback is not selected then SQL Server will automatically failover to AlwaysOnN1 as soon as it restarts. But it is possible that the issue that caused AlwaysOnN1 to fail in the beginning has not been addressed yet and hence AlwaysOnN1 can shut down again which will cause a failover to AlwaysOnN2. To prevent this scenario, by default Prevent failback is set. If you like failback to occur during certain hours, you can set it in this window.
Review the properties of SQL Server (INST1) resource as shown below.
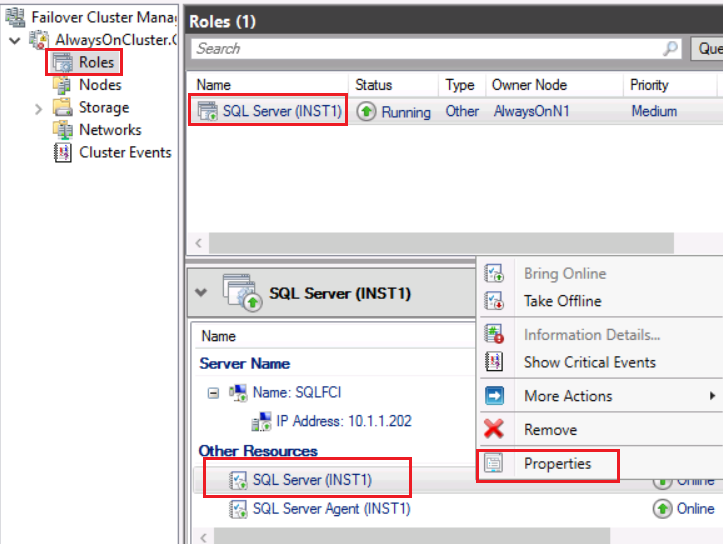
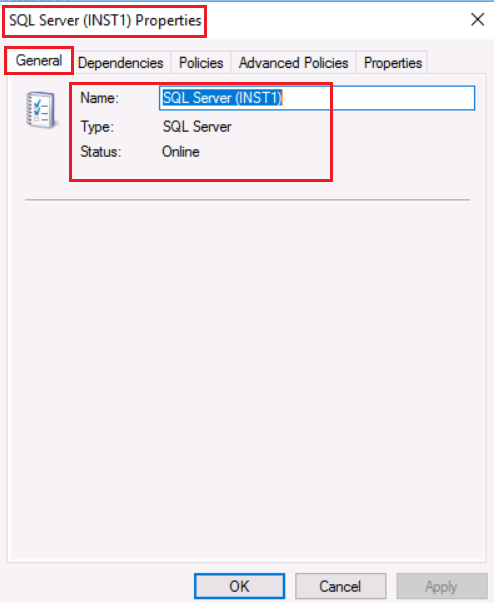
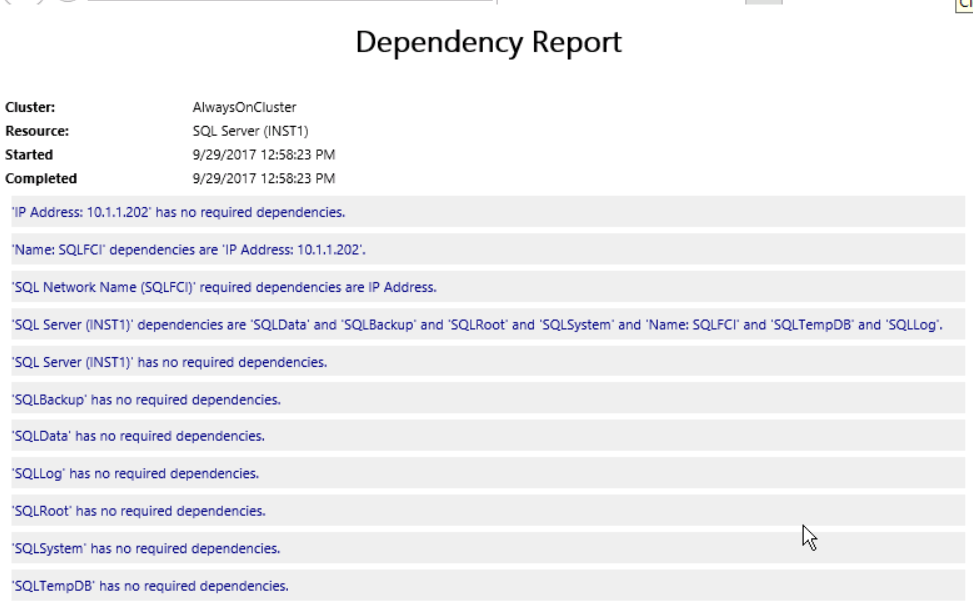
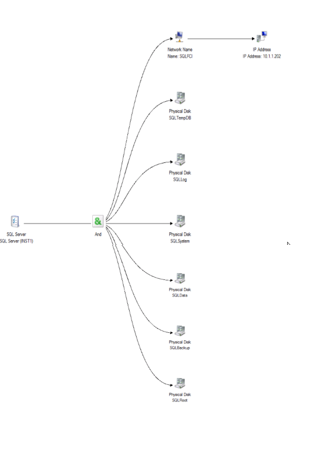
Ensure that the SQL Server resources are dependent on the mount points and network name. By default, setup automatically adds the mount points and base drive as dependencies for the SQL Service resource.
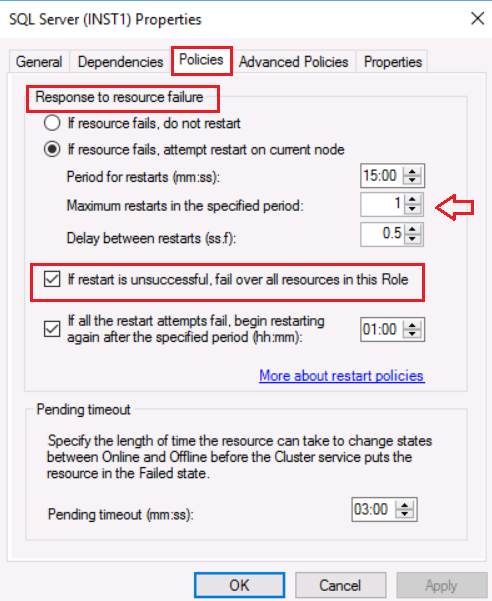
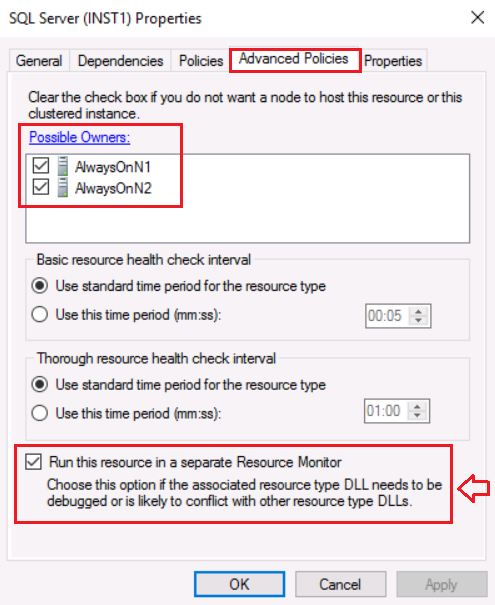
By default, SQL Server resource runs in a separate Resource Monitor.
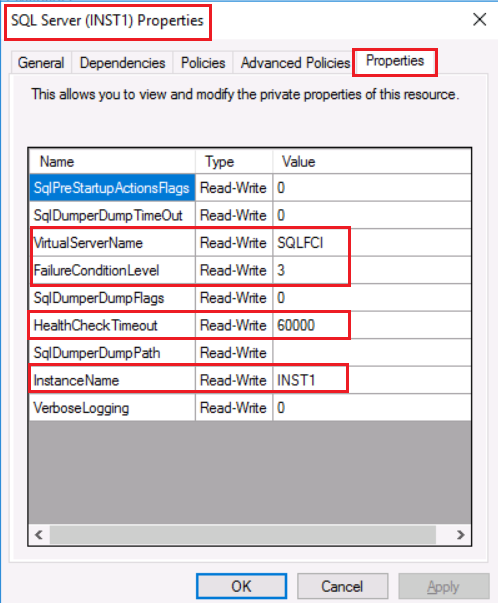
SQL Server resource has an extra tab named Properties where all the default properties can be viewed and modified.
Task 3: Review SQL Server resource dependencies
Perform this task on virtual machine AlwaysOnN1 as logon user CORPNET\cluadmin using the password Pa$$w0rd.
In Failover Cluster Manager, right-click SQL Server (INST1) resource and select More Actions > Show Dependency Report.
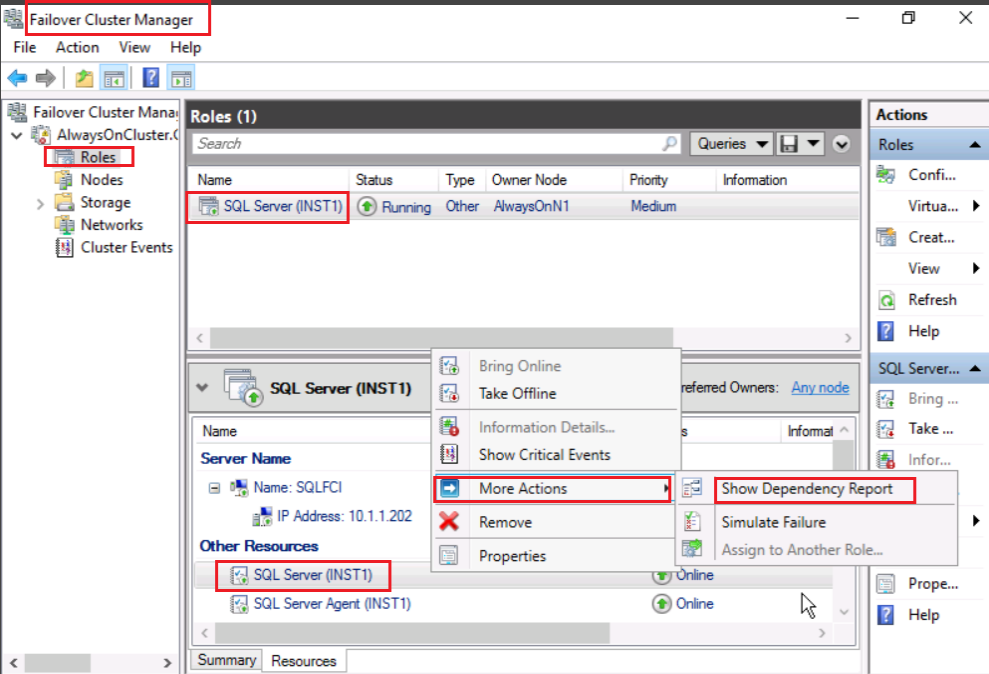
Review the Dependency Report then close the browser window.
Congratulations!
You have successfully completed this exercise. Click Next to advance to the next exercise.
Exercise 2: Manually failover SQL Server FCI from one node to another
In this exercise, you will failover SQL Server FCI from one cluster node to another, and ensure that the SQL Server role and the resources in the role comes online on the other node.
Task 1: Manually failover SQL Server FCI
Perform this task on virtual machine AlwaysOnN1 as logon user CORPNET\cluadmin using the password Pa$$w0rd.
Open Failover Cluster Manager.
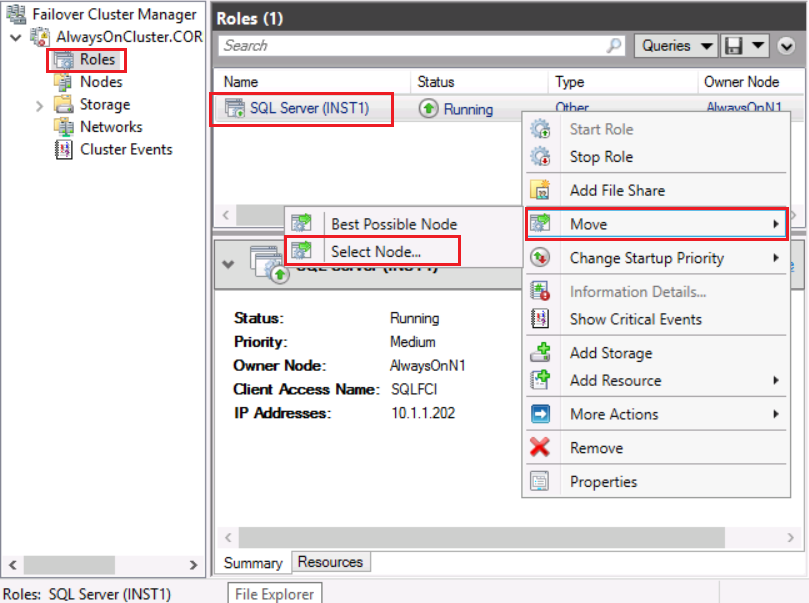
Observe the node on which currently SQL Server is running. When the screenshot was taken, it is running on AlwaysOnN1. Right-click the SQL Server (INST1) role and select Move > Select Node… as shown below.
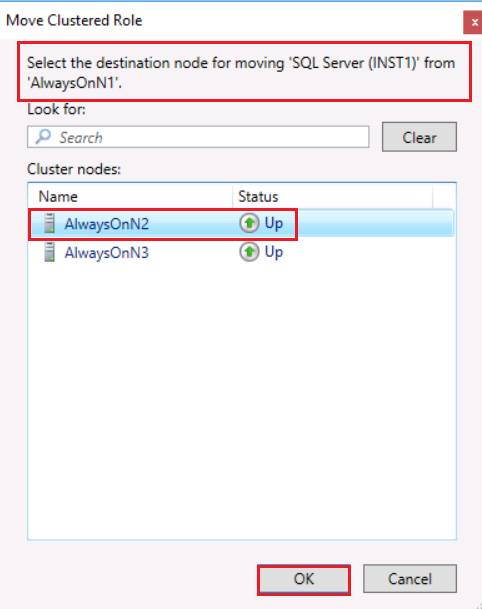
In the Move Clustered Role window, select the destination node for moving SQL Server (INST1) from AlwaysOnN1. Select AlwaysOnN2 and click OK.
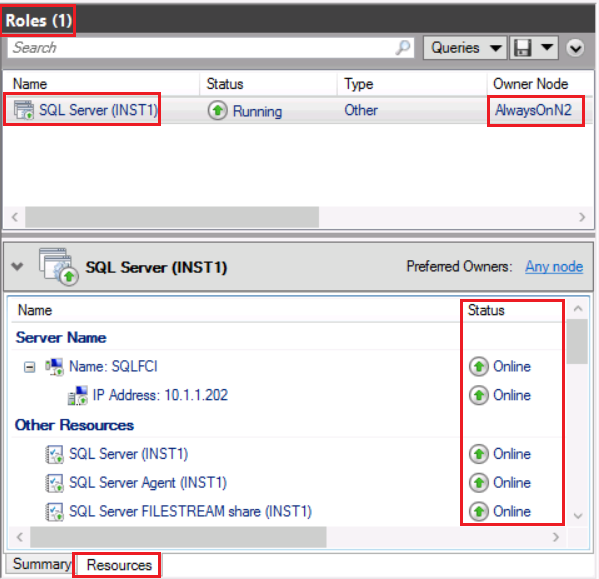
Observe that the role and the resources in the role fail over and come Online on the other node.
Perform above steps to fail back the SQL Server (INST1) back to original owner node (AlwaysOnN1 in this case).
Congratulations!
You have successfully completed this exercise. Click Next to advance to the next exercise.
Exercise 3: Configure a Static TCP/IP Port for SQL FCI
By default, SQL Server named instance listens on a dynamic TCP/IP port. In this exercise, you will configure a static TCP/IP port for SQL Server failover cluster instance.
Task 1: Find the node that owns SQL FCI
Perform this task on virtual machines AlwaysOnN1 as logon user CORPNET\cluadmin using the password Pa$$w0rd.
Open Failover Cluster Manager and review the SQL Server Cluster Group as shown below.
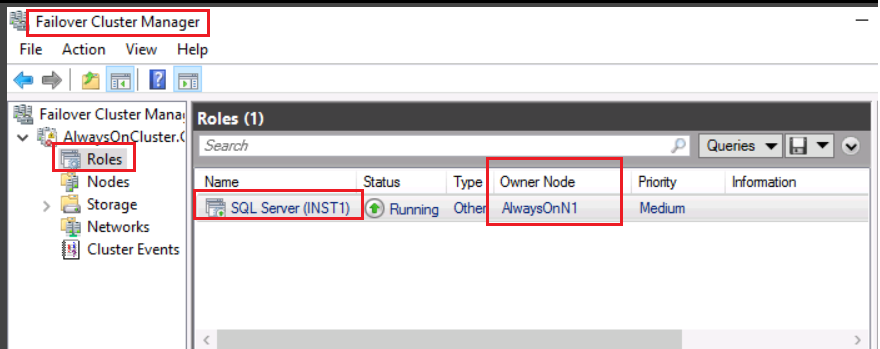
Task 2: Configure a Static TCP/IP Port
Log on to the Owner Node (AlwaysOnN1 as per the following screenshot) with logon user CORPNET\cluadmin using the password Pa$$w0rd
Open SQL Server Configuration Manager
If the User Account Control popup appears, click Yes.
Expand SQL Server Network Configuration. Select Protocols for INST1. Right-click TCP/IP and select Properties.
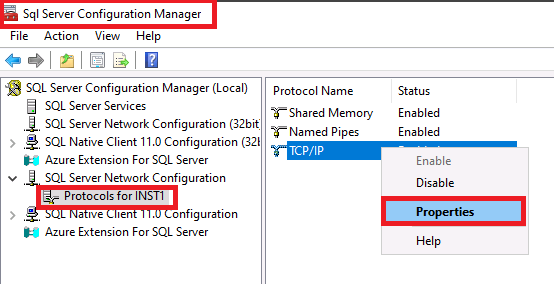
On the TCP/IP Properties page, click the IP Addresses Tab. Scroll to the IPAll section.
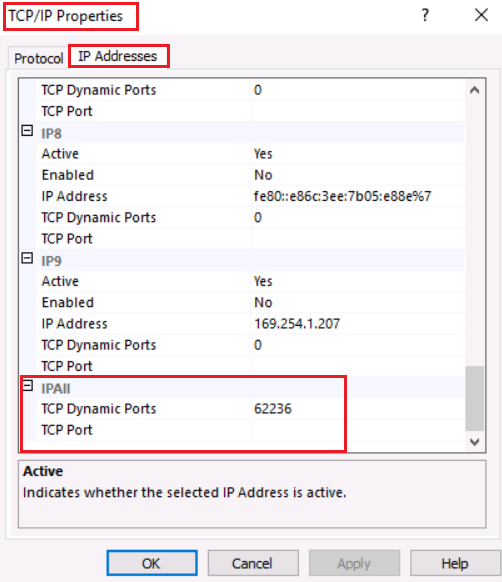
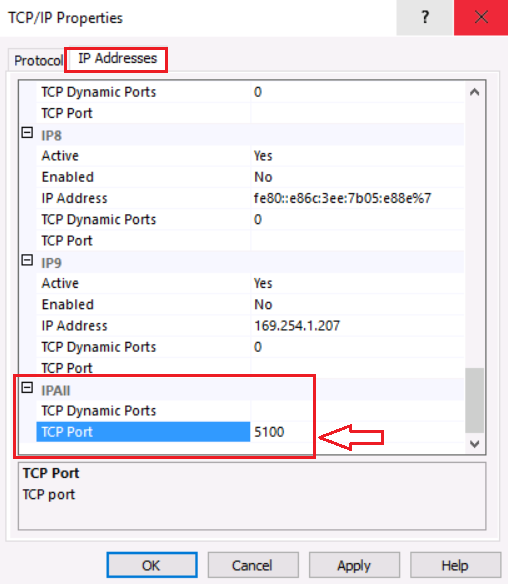
If there is a value in TCP Dynamic Ports, delete it. Select TCP Port, type a valid port number (for example, 5100), and then click OK.
Review the Warning and click OK.

During a scheduled downtime, restart the SQL Server service so that the changes take effect. For the lab, restart the SQL Server service now.

Same action you can do from Failover Cluster Manager by taking the Cluster Resource (SQL Server Service) Offline and then brining it online.
Task 3: Verify that the TCP/IP port changed
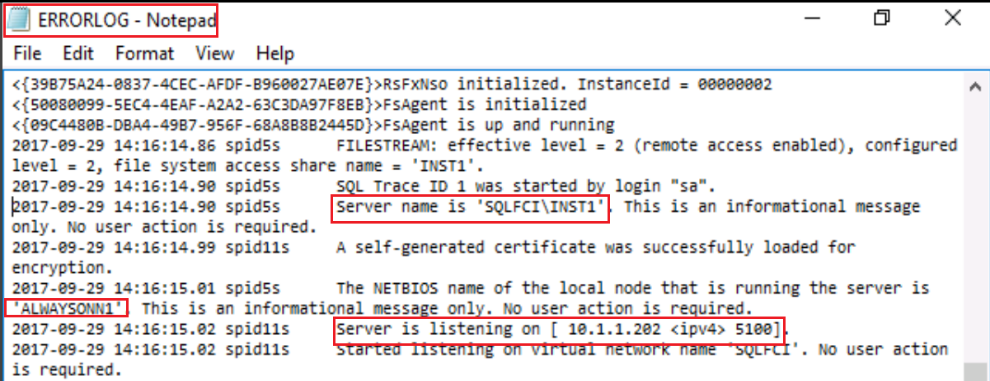
Open the SQL Server Error Log. (F:\SQLSystem\MSSQL16.INST1\MSSQL\LOG\Errorlog) using Notepad.
If you receive a message indicating you do not have permission, click Continue to grant yourself permission.
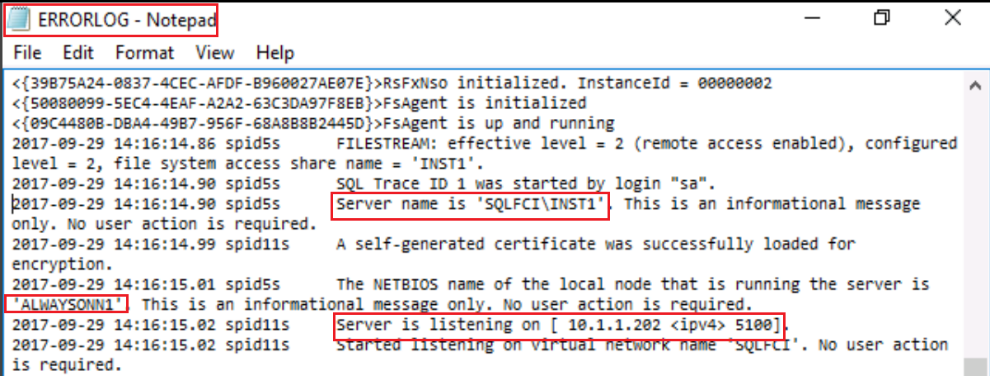
Verify that the new TCP/IP port name is listed, by searching for Server is listening on, and then close Notepad.
Congratulations!
You have successfully completed this exercise. Click Next to advance to the next exercise.
Exercise 4: Enable a Firewall Exception for SQL Server FCI on the Cluster Nodes
Users are complaining that they cannot connect to the SQL Server AlwaysOn FCI from their client machines. They are getting the following error message when trying to connect using SQL Server Management Studio on their workstation.
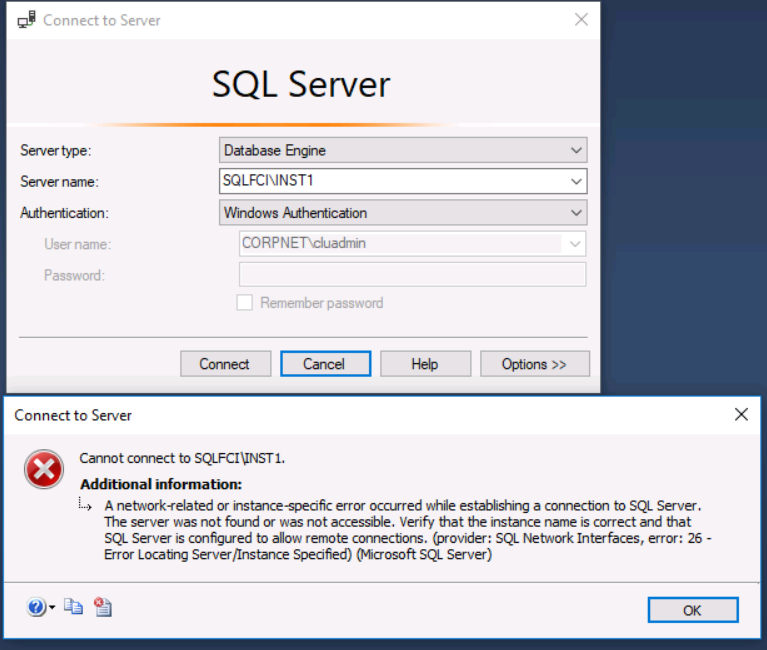
You are the DBA and need to ensure that the users can connect without getting any errors. You know that by default, the firewall in Windows Server is ON, so clients cannot connect to SQL Server. To access an instance of SQL Server through a firewall, you need to configure the firewall on the computer that is running SQL Server to allow access.
Task 1: Configure the firewall on ALL the cluster nodes
Perform this task on virtual machines AlwaysOnN1 and AlwaysOnN2 as logon user CORPNET\cluadmin using the password Pa$$w0rd.
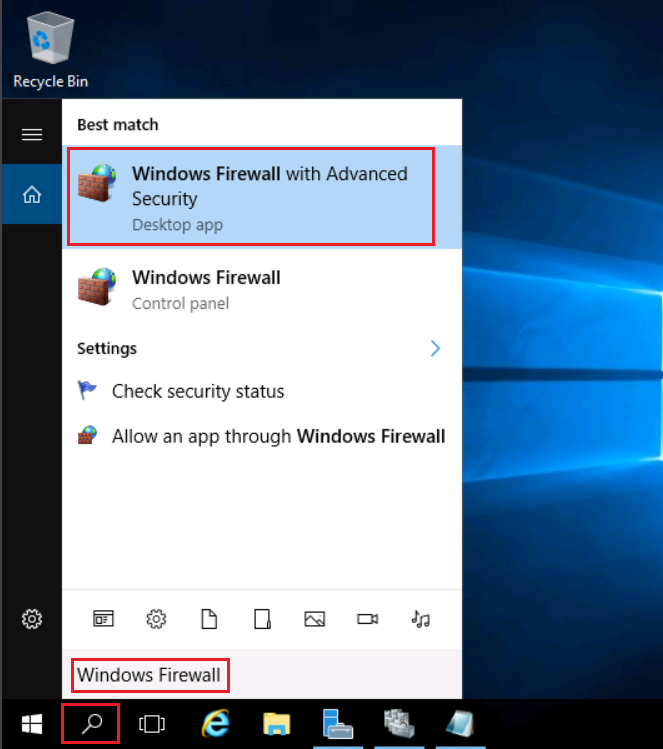
Open Windows Firewall with Advanced Security on the cluster node.
Click the Windows Search icon and type Windows Firewall
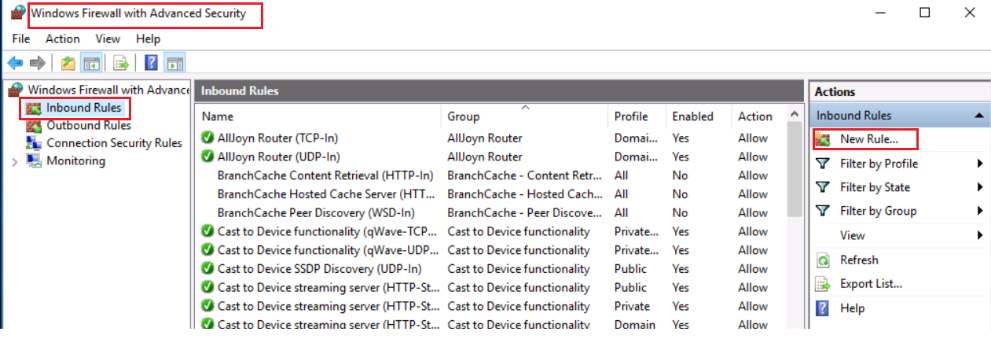
Click Inbound Rules New Rule under Actions.
In the New Inbound Rule Wizard, on the Rule Type page, select Port, and then click Next.
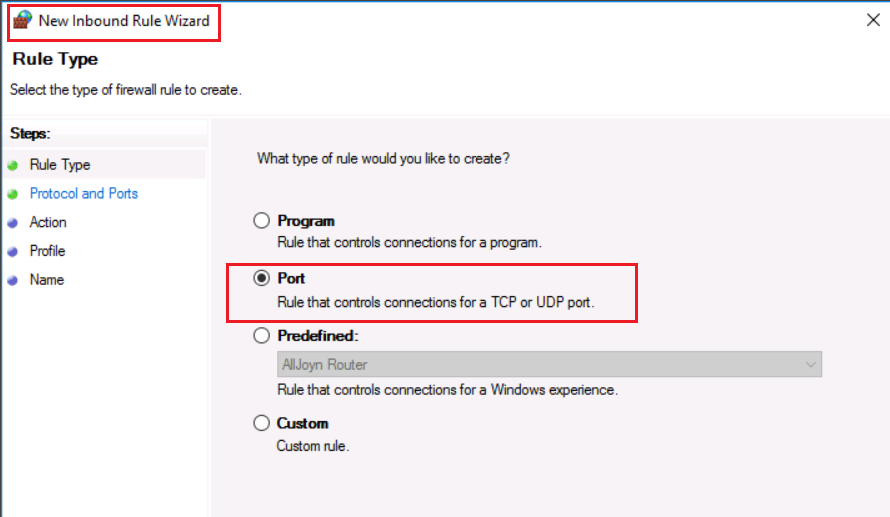
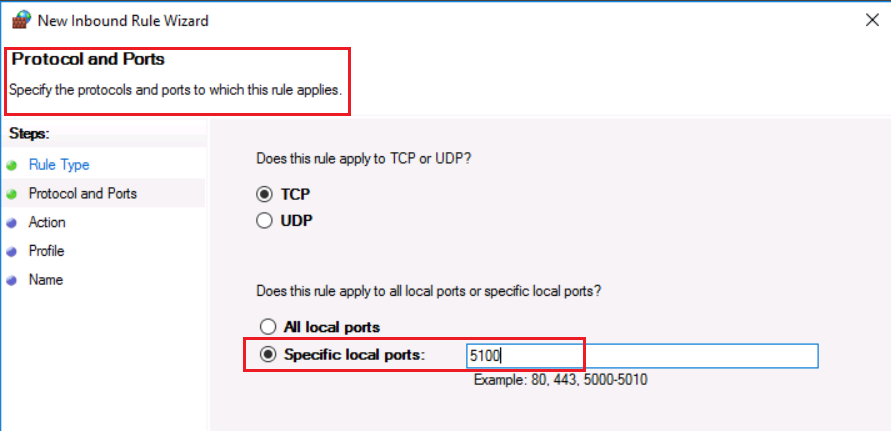
On the Protocols and Ports page, select TCP. Type the TCP port, that SQL Server listens on, in the Select specific local port section.
To find the TCP port that SQL Server listens on, open SQL Server Errorlog.
On the Action page, review the options. For this exercise, use the default selection, and then click Next.
On the Profile page, review the options. For this exercise, use the default selection, and then click Next.
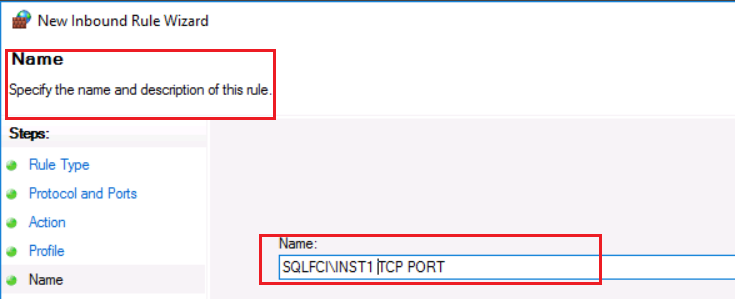
On the Name page, type a descriptive name (for example, SQLFCI\INST1 TCP PORT) for the inbound rule, and then click Finish.
Repeat steps 2-8 to create the UDP inbound rules for SQL Browser Service
The SQL Server Browser service uses UDP broadcast on port 1434
Ensure that you have completed the above steps 2 - 9 to create TCP and UDP inbound rules on both cluster nodes AlwaysOnN1 and AlwaysOnN2.
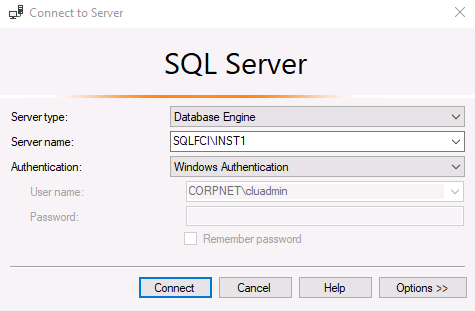
Log on to AlwaysOnClient as CORPNET\cluadmin using Pa$$w0rd as the password.
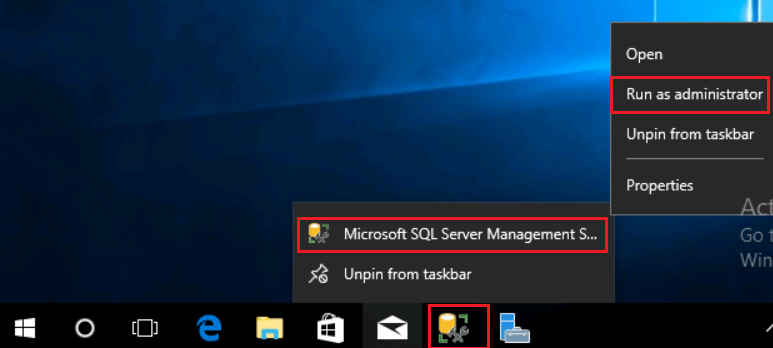
Open SQL Server Management Studio and connect to the SQL Server failover cluster instance SQLFCI\INST1
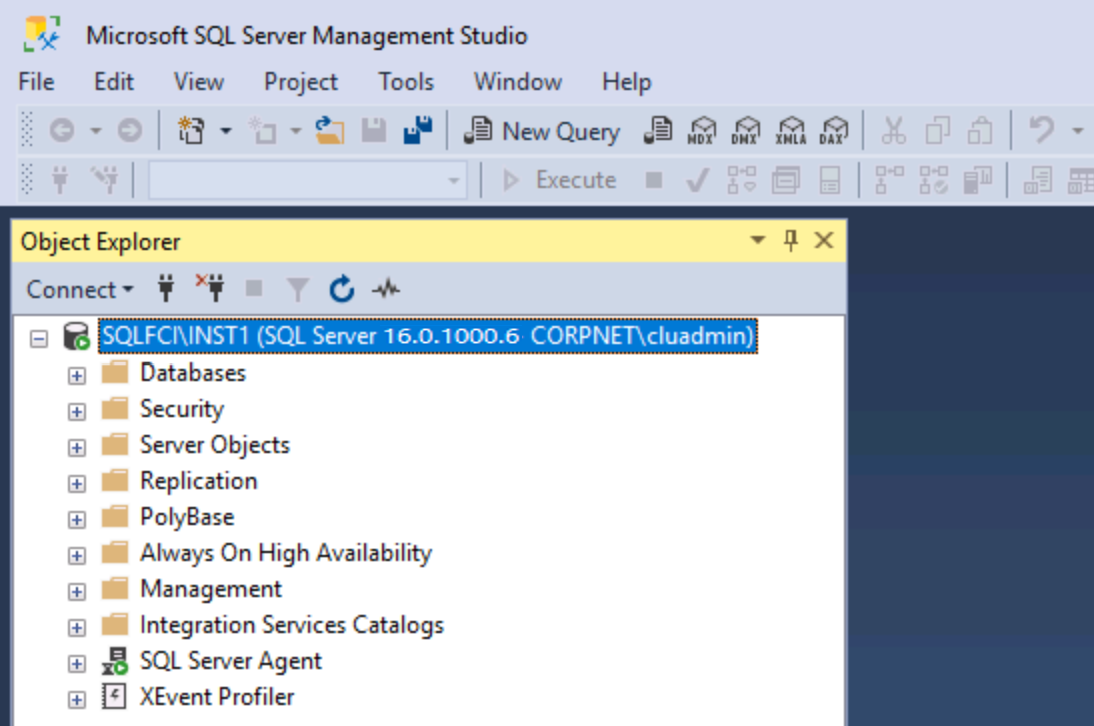
Congratulations!
You have successfully completed this exercise. Click Next to advance to the next exercise.
Exercise 5: Configure Remote Access for a dedicated administrative connection
SQL Server provides dedicated administrator connection (DAC) for administrators when standard connections to the server are not possible. On cluster configurations, the DAC will be off by default. If SQL Server is unresponsive and the DAC listener is not enabled, you might have to restart SQL Server to connect with the DAC. Therefore, we recommend that you enable the remote admin connections configuration option on clustered systems. For more information, refer to Diagnostic Connection for Database Administrators
Task 1: Configure Remote Admin Connection
Perform this task on virtual machine AlwaysOnClient as logon user CORPNET\cluadmin using the password Pa$$w0rd.
Open SQL Server Management Studio, connect to the SQLFCI\INST1 instance, and then open a Query window.
Execute the below command to check the current (default) value of 'remote admin connections' configuration
TSQLEXEC sp_configure 'remote admin connections'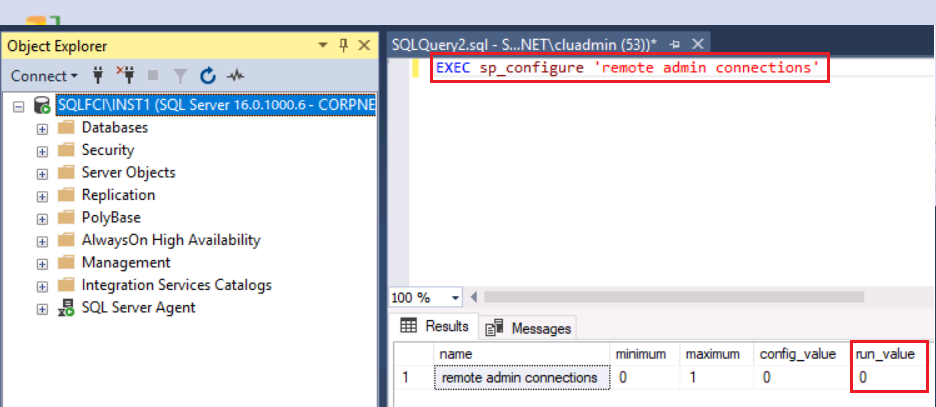
As expected, the default value is 0 (disabled).
Execute the below command to enable 'remote admin connections'
Open Notepad in the lab environment VM. Use the Type Text feature to enter the code into Notepad, copy the code, and then paste it into the Query Editor. This will bypass the autocomplete features in the Query Editor.
TSQLEXEC sp_configure 'remote admin connections', 1
RECONFIGURE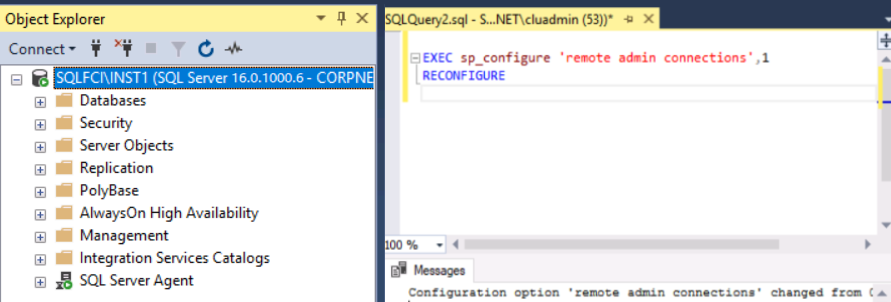
Congratulations!
You have successfully completed this exercise. You can move to the next lab.